Creating a new project
If a message requesting email is displayed, fill in the "Registered Email" field with your registration email used in "RC REGISTER".
RC Wizard is self-explanatory and very intuitive.
At the end of this topic and in the RadCORE folder you will find a file containing some tutorials showing step by step how to create projects with RC WIZARD.
LEARNING TIP
Open 2 instances of DELPHI and create 2 projects with RC WIZARD:
1) Choose the BRAZIL (Brazilian users) or GLOBAL (users outside of Brasil) model, which refer to the MEGA DEMO as already explained in the previous topics, so that you can have an overview of RadCORE's resources;
2) Choose the STARTER model so you can start learning about RadCORE's most important feature, which are the responsive blocks and layout features.
In the BRASIL/GLOBAL model you will see the final result of the resources working so, to learn, little by little try to reproduce it in the STARTER project but REMEMBER:
It's not just COPY and PASTE.
You have to read this documentation step by step to learn that every RadCORE feature needs rendering and some functions are required for this to happen correctly.
TAKE YOUR TIME !!!
When you master (that's right. FIRST MASTER the layout resources) you can exchange STARTER for a BASE to learn about configuring MENUS, opening forms/frames, etc. and later, exchange BASE for a BASE DB to practice DATABASE resources.
If you follow this guidance, I'm sure you will be part of the group of successful RadCORE users who have already had applications in production for years and/or who provide consultancy helping other users to migrate their applications to the WEB with RadCORE.
Note:
The "BRAZIL" model will have examples of using ZIP code search, IBGE code redemption, etc. and some other specific details for Brazilians.
After clicking on the model( on this sample would BRAZIL ), the following screen will appear:
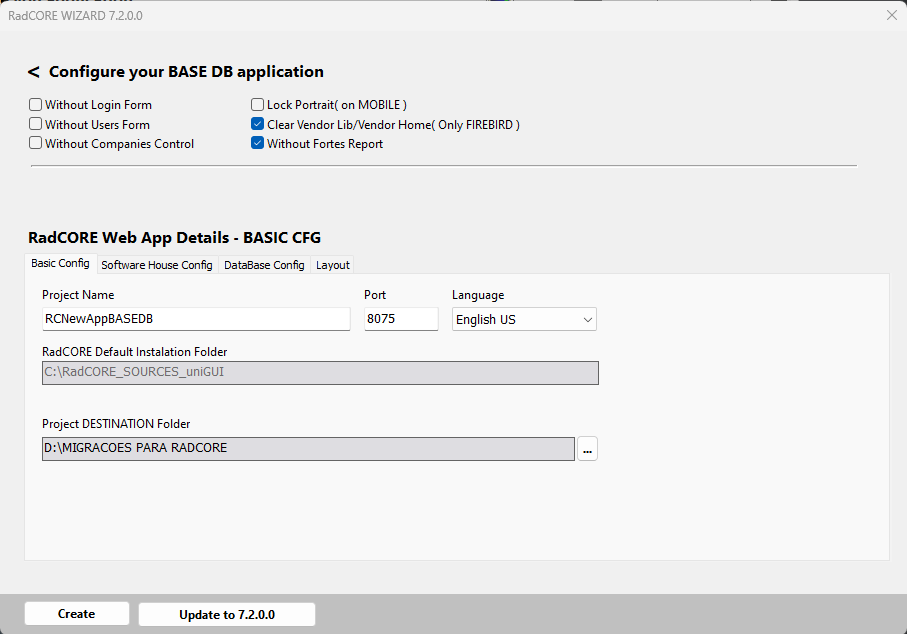
The options are:
- Without Login Form: Creates the application without using the login form, leaving it up to you to create your own.
- Without Users Form: Creates the application without using user permission control, leaving it up to you to create your own.
- Without Companies Control: Creates the application without using multicompany control.
- Lock Portrait: Does not allow rotating the screen if accessed from a mobile device. This is only allowed when the browser is in fullscreen.
- Clear Vendor Lib/Home: Removes the content, in the Server Module, of the properties that identify the FIREBIRD library.
- Without Fortes Report: Creates the application without using examples or reporting resources that use the FORTES REPORT component.
If you have installed the "FORTES REPORT" report generation component, you can uncheck the "Without Fortes Report" option, so you will be able to see some report generation examples.
IMPORTANT
Remember that you are now developing for the WEB and that some web applications use APIs to generate reports so as not to demand too much from the application itself in processing these reports.
In this example we will not check any option.
In "Project Name" define your project name without spaces and in "App Name" you can use spaces.
Set the "Port". By default RadCORE uses the 8075.
Set the language (The other language options will be displayed when running the application).
note:
RadCORE's mandatory installation folder is the same as indicated in "RadCORE Default Installation Folder".
Always keep the folder indicated in the "installation" topic.
Before proceeding, check that you did this correctly to avoid errors when creating the project and that the destination folder is clean.
Do not create a new project overlaying a previous project.
In the "Software House Config" tab you will define your company data.
If you have selected a project model: BRAZIL, GLOBAL or BASE DB, the "DataBase Config" tab for configuring access to the database will be active.
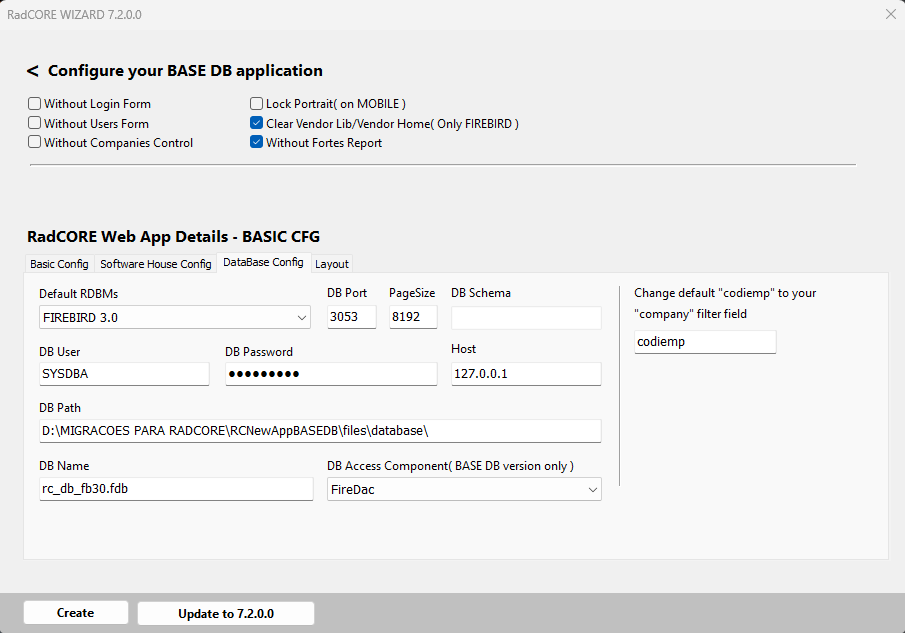
By default, RadCORE uses the 32-bit FIREBIRD 3.0 database as it is easy to install (but you can select another version).
From version 4.3.0.3 you will be able to choose between FIREBIRD versions.
Note: In the installation folder, "C:\RadCORE_SOURCES_uniGUI\extras" the installation files for several versions of FIREBIRD, including an installation tutorial.
From version 6.1.0.1 you will be able to choose:
For FIREBIRD, you can set the "PageSize".
If your DBMS accepts the use of schemas and you are using it in your database (for example, in PostGres which uses the "public" schema by default), you can define it in the "DB Schema" field.
By default, the RadCORE example tables use the "codiemp" field as a filter for multicompany control. If you use something similar but the field name is different, you can now define that name before creation.
As explained before, in the folder "C:\RadCORE_SOURCES_uniGUI\inetpub\wwwroot\radcore\files\database" you will find backup files for MySQL, PGSQL and SQLSERVER.
If you choose one of these versions, you must create a database called "rc_db" (see the topic "Patterns and Conventions/Databases") and restore the backup of the chosen database model.
Note: I repeat again that the version of DELPHI I work with is PROFESSIONAL and I don't have access to SQL SERVER, ORACLE... So if you select SQL SERVER you will have to add some components that I don't have available in my work environment and of course, watch the tutorial at:
- "C:\RadCORE_SOURCES_uniGUI\RadCORE BRASIL\DOCS\UPDATES RADCORE SQL SERVER.docx"
- "C:\RadCORE_SOURCES_uniGUI\RadCORE GLOBAL\DOCS\UPDATES RADCORE SQL SERVER.docx"
This tutorial was courtesy of Mr. FÁBIO OLIVEIRA and other users also contributed with some internal tips for using SQL SERVER.
IMPORTANT TIP:
Set RadCORE's initial study environment to FIREBIRD 3.0 32bit which is the default.
Check on: C:\RadCORE_SOURCES_uniGUI\extras
Install Firebird 32 bit by marking the option to copy the DLL (FBClient) to the System folder.
By default, the "port" used by Firebird is 3050.
Note when using RC Wizard to select the correct "port".
The video shows the step by step, what matters is the detail where we mark to copy DLL to Windows folder:
https://1drv.ms/v/s!aovhnjibiomaw3iabqvp3u7dayt?e=rtdrpc
Once you are familiar with RadCORE it will be easier to configure settings for other RDBMs.
It is extremely important that you already master how RadCORE works to create a new project using your own database structure (remembering that depending on the model chosen and whether you will have user control, etc... you have to adapt the tables used by RadCORE in your database structure).
Note: Only BASE DB version can be used with UNIDAC components.
Optionally, you can access the "Layout" tab and select the initial theme.
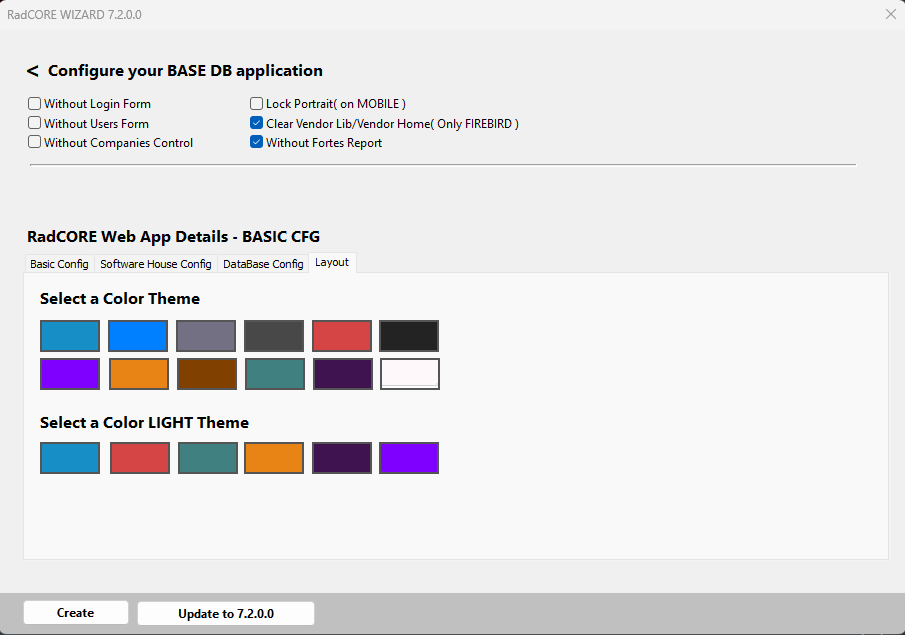
Finally, click on "Create" and your application will be created.
In these videos you can see more details about the use of RC WIZARD:
BASE
https://1drv.ms/v/s!AovhnjIbioMA229E7uFzTns1kM-U?e=UcqnTF
STARTER
https://1drv.ms/v/s!AovhnjIbioMA23HfVlCIJQR5uM5Y?e=hCoa3f
BASE DB
https://1drv.ms/v/s!AovhnjIbioMA23IQZ7ZZzVK1u3z6?e=LbvxpI
BRASIL / GLOBAL
https://1drv.ms/v/s!AovhnjIbioMA23NH7Ty9B9xxb5qf?e=Jae4h5
Created with the Personal Edition of HelpNDoc: Easy EPub and documentation editor